

Photo Credit
The Master Switch
The Master Switch
Setting up a home theater system can be a daunting task. Not only do you have to contend with miles and miles of speaker wire, as well as figuring out where exactly you’re going to put the damn things and whether or not you need to drill holes in your ceiling, but you also have to tangle with the absolute beast that is the AV receiver. This is the beating heart of your system, and even on a relatively small one, it’s likely to be quite powerful, with a daunting collection of ports and toggles and switches. What we're going to do in this guide amounts to two thing: breaking down the mysteries of the rear of the receiver, explaining what all those ports and connections are, and then explaining how to connect it all up with an example setup. So let’s get started. We are, by the way, going to skip the power port. We’re pretty sure you can figure that one out on your own.
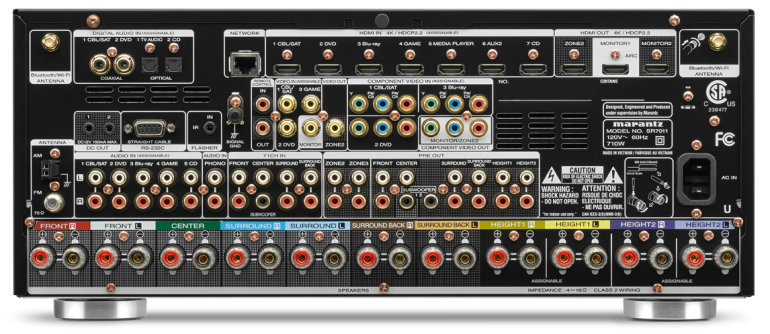
The rear of the AV (audio/video) receiver is where the action is at. Even if you’re reasonably au fait with setting things up, there are bound to be connections that you have absolutely no idea how to operate. Their purpose is a mystery. So in this guide, we’re going to completely demystify it. We’re going to break down every single port on the rear of the receiver: what you plug into it, and how you use it.
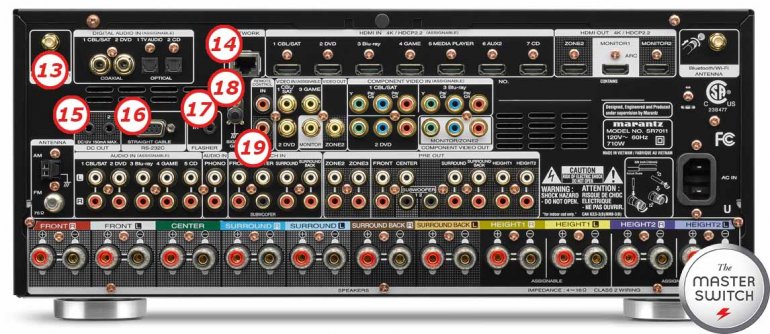
As a test subject, we are going to be using a very hefty 11.2 receiver: the Marantz SR7011 (a modern version is the Marantz SR6015). This has a huge, intimidating set of connections on the back, and no matter what receiver you actually use, chances are its ports are included on this one. While we probably won't cover every single type of connection, which are as varied as the number of receivers themselves, we'll get the big ones, and you should leave this guide with enough knowledge to understand what goes where, and what all of these strange terms mean. And when we're done, we'll talk about a practical example of how to put it all together.
You'll have to forgive the numbering here. While we've tried to group things into some semblance of order, the haphazard nature of AV receivers makes it tricky. We'll try be as straightforward as we can.
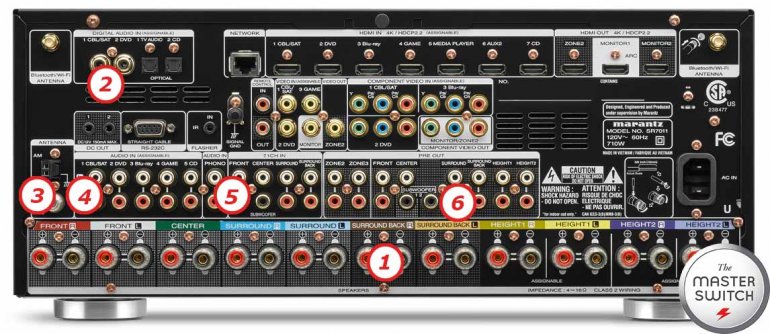

These are, quite literally, what you wire your speakers into. Each speaker will have a single cable running from it, split into two parts, which usually has to be bought separately to the speaker. What you’ll do here is wire each speaker to its corresponding section - so front left to front left, center to center, surround left to surround left etc. If you need help on setting up a surround system, you can check out this little guide we did here.
To connect each wire, make sure that you’ve stripped the ends so the bare wire is showing (a few minutes with a sharp knife and a cutting board will do the job – although please, please, please be careful with your fingers while you’re removing the insulation, and although you probably don’t need to be reminded of it, do NOT do this with anything plugged in). The positive wire needs to be connected to the positive terminal (red) and the negative to the negative (black). What you’ll be doing is essentially unscrewing the connectors on the receiver to reveal a small hole, which you’ll then insert the bare wire into before screwing it back down.
And that’s it! These are the simplest connectors to deal with, as they are usually clearly labelled, and while it’s a little bit fiddly to insert the wire, the actual process should be very straightforward.
Also, super-important: your sub gets connected elsewhere. For that info, see 18. Pre Out, below.
OK. Let’s say the sound you want to hear over your speakers isn’t actually coming from your console or Blu-ray player.
Let’s further say it’s coming from the TV itself – say, you’ve used your TV’s smart feature to dial up Netflix or a sports event. That means that, essentially, it’s your TV that will need to send sound to the receiver. But how does it do this?
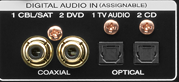
The answer is in something called ARC (Audio Return Channel). It’s a feature of most modern HDMI systems that allows the TV to send audio back to the receiver. Sometimes, however, a TV won’t be compatible with ARC. You’ll need to check the details of whichever model you are using, but if this is the case, it means you need to break out the big guns. And by big guns, we mean optical cable, which is a special type of thin cable with a tiny transparent dome on each end, that in this case is used to send audio back and forth. That’s what you’ll be plugging into the TV audio port.
No optical? No problem. Use a coaxial cable, or coax, connecting it from the coax out on your player. Coax cables have a single pin surrounded by a metal ring, and carry digital sound.
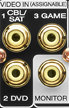
You can also use the Digital Audio In section to connect a set-top or satellite box, an old TV without an HDMI connector, or a DVD or Blu-ray player. Chances are, you probably won’t have to worry about this particular section of the receiver. At least, don’t start messing with it until you’re absolutely sure that your HDMI cable/ARC isn’t happening.
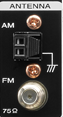 You know how radio works, don’t you? If you’re the kind of person who enjoys listening to talk radio through your absolute beast of a surround sound receiver, then… Well, firstly, good for you, and secondly, this is where you connect the aerial. One will come with your system.
Pull the tower back, insert the wire, let it go, and you’re done. It's about the simplest thing on the entire back end, and all you need - and which most manufacturers include - is that aerial. Get to it.
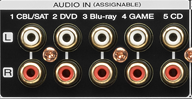 If your DVD player or whatever doesn’t handle HDMI, this is where you connect the audio. Just like with the speaker wire, you’ll have two channels, so two connections, and you’ll need to make sure the + (red) and - (black) are plugged into the correct ports.
Usually, you’ll use standard RCA cables for this. Connecting it up should be pretty straightforward, with one caveat. If you have a turntable, you’ll need to plug it into the Phono inputs; reason being, this uses a special phono cable, and is designed to handle the amplification of that particular category of electronics.
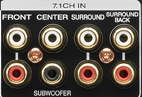 Sometimes, you have a playback device that offers surround sound built-in. If that’s the case, you’ll be connecting it directly into this particular section of the panel. 7.1 refers to the seven-channels-and-a-sub setup of high-level surround sound systems.
This can be absolutely fantastic if a device like a Blu-ray player offers this functionality, so be sure to use it if you get the chance. In all cases, refer to the manual of your player first, and make sure that it comes with the right set of cables to allow you to hook all this up. All you need to do is run the cables from the dedicated outputs on the back of the player to the 7.1ch input section on your receiver.
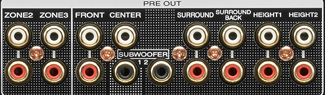 Some pieces of equipment don’t need amplification. They’ve got their own amplifier, and they don’t need any external power messing with them, thank you very much.
If you still want to connect them to your receiver, you’d send signal out to them using this section.
This is important for one major thing: the subwoofer. Most subs have their own power, and so need to be connected up separately from the rest of the speakers. In almost all cases, all you have to do is connect them straight to the port labelled ‘Subwoofer’ with the included cable.
However, as in this case, you might see additional connections there. What are they for? If you want to add additional speakers to your setup, and use a separate amplifier (perhaps to take advantage of raw power, or particular sonic character) then this is where you connect them up. We are getting into serious gearhead territory here, so don’t worry too much if you don’t use these particular ports. For most people, a connection for the subwoofer will be more than enough.
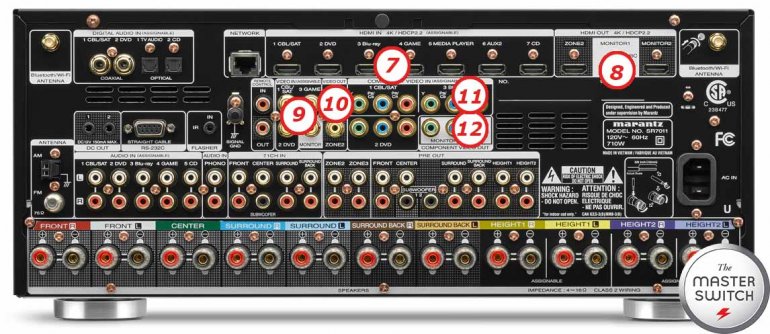
 Almost all consoles, Blu-ray players and DVD players run off HDMI (High-Definition Multimedia Interface) these days, as do most TVs. An HDMI cable has a flat connector with a very distinctive shape, and the chances are that if you’ve bought a TV made in the last ten years, you probably know what it looks like. These ports are where you will connect your players (consoles, DVD etc.), running an HDMI cable from their HDMI outs to the inputs on the receiver.
You don’t, by the way, have to pay too much attention to the labelling on each of the ports. Feel free to plug your Xbox into the one labelled CD, or whatever. All HDMI inputs are created equal.
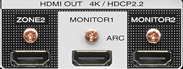 Very simply, this is where you send a video signal from the receiver out to your TV.
All you need to do with this one is onnect an HDMI Out to an HDMI port on your TV, and assuming there’s something playing on your console or Blu-ray player, and assuming you’ve selected the right HDMI port using your TV remote, you’ll start seeing a picture. Simple!
 Amazingly, some DVD and Blu-ray players still don’t use HDMI. If that’s the case, they’ll be using video cables to connect to the receiver in question, and that’s what you put in here. A video cable should come packaged with these machines, if that’s the case, and all you have to do is hook it up to get a picture. Be aware that you’ll have to connect the audio separately, using one of the Audio In ports mentioned in this guide - either digital (above) or analog (below).
By the way, we apologise for not being able to tell you exactly how to connect up your individual units. So much is dependent on their own unique specifications, so we’d say refer to the manual if you’re stuck.
![]() Again, this is for when your TV lacks HDMI – and while on the subject, just get a damn HDTV already. Seriously.
Again, this is for when your TV lacks HDMI – and while on the subject, just get a damn HDTV already. Seriously.
In the same way as the previous section, just run a video cable from the Monitor out to your TV. You’ll need to use a separate cable to transmit the audio, though.
Some receivers come with additional ports allowing you to collect multiple monitors (the zone 2 on the back of our Marantz) which is always handy.
 Now we’re getting really old school.
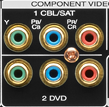
The problem with home theater manufacturers is that they have to take into account every eventuality. They can’t just assume that all their customers will be using the same connections and advanced equipment. Hence, the presence of component video ports, a technology that is to modern home entertainment what the penny farthing is to road cycling.
Component video cables split the signal into three separate colour components, which is why they are triple headed monsters. Connecting them is easy enough – just line up the colors. As with all the sections, you don’t have to obey the labels, so feel free to plug your DVD player into the slots marked Cable. Just connect the Out ports of your player to the In ports of your receiver.
But seriously: if you have the option of avoiding component video, do it. It’s a real pain, and HDMI is so much better. And remember, component video just carries video. You’ll need to wire up the audio separately.
 Same here as for the video out above. This is where you connect your TV if you’re using a component video cable.
Please don’t use a component video cable. This isn’t 1990.
 Another very straightforward connector. If your receiver has the ability to link up with your home network, or stream on Bluetooth (as this Marantz does) then this is where you will attach the antennae that comes with the unit.
Usually, all you have to do is screw them in, and they’ll start working automatically – although you will have to obviously tell the system which network to connect to, using the on-screen menu.
 Easy peasy. If your wireless network is sketchy, then you can use this to connect directly to your route with an ethernet cable. The functionality will be exactly the same, you’ll just be wired up instead of wireless. Ethernet cables are easily identifiable, and simple to use.
 This one isn’t too common, but it can be seriously useful.
Essentially, it allows you to trigger another device when you switch on the receiver. The best example we can think of is to have a projector screen automatically lower itself when you turn the receiver on. You’ll connect the two using a monaural mini plug cable, which can be bought very cheaply on Amazon.
A word of caution. Make sure the input and output voltages on each device match. You should be able to find them in the respective manuals.
 Hoo-boy. Now we’re talking.
You almost certainly won’t use this one unless you’re into serious custom home theater builds – in which case, this entire article is probably quite useless for you. It’s one of the few ports on the back of a receiver that doesn’t carry audio or video. Instead, you use the multi-pin, locking cable to connect things like PCs, or external touchpads for controlling the on-screen action.
It means you can also automate the system to, say, turn on and off at a particular time. Again, this isn’t something most people will need to mess with, but it’s good to know what it is regardless.
![]() Oh, so you don’t like the existing remote for your receiver? Well, this port allows you to use a better one. By buying something known as an IR flasher (or blaster), you can connect it up to this particular port and control the receiver using the remote of your choice.
Oh, so you don’t like the existing remote for your receiver? Well, this port allows you to use a better one. By buying something known as an IR flasher (or blaster), you can connect it up to this particular port and control the receiver using the remote of your choice.
This isn’t too common, especially on cheaper models, and you’ve really got to be pretty exacting with your home theater to go to these lengths. But if you do decide to do it, at least it’s very simple to operate.
![]() This is for turntables. Without getting too technical about it, a turntable without its own preamp will need to be electrically grounded, otherwise you risk getting an unpleasant humming sound. You’ll connect the two using grounding wire. Simple, straightforward, and once it’s done you can forget about it.
This is for turntables. Without getting too technical about it, a turntable without its own preamp will need to be electrically grounded, otherwise you risk getting an unpleasant humming sound. You’ll connect the two using grounding wire. Simple, straightforward, and once it’s done you can forget about it.
![]() Let’s say that for whatever reason, you have to hide your receiver in a cupboard, or somewhere where you can’t easily get to it. If that’s the case, then you might not be able to control it with the remote. This port fixes that, allowing you to attach an external receiver that can communicate with your remote. If that’s the case, you’ll be connecting the external receiver to the In port.
Let’s say that for whatever reason, you have to hide your receiver in a cupboard, or somewhere where you can’t easily get to it. If that’s the case, then you might not be able to control it with the remote. This port fixes that, allowing you to attach an external receiver that can communicate with your remote. If that’s the case, you’ll be connecting the external receiver to the In port.
So what’s the Out port for? Well, if you’re using another device, like a CD player, and you want to control the receiver through that, then that’s what you use it for. Again, this is a port for a very specific circumstance, and it won’t be used by everybody. Still, good to have.

We'll be honest: it's really, really hard to cover absolutely every eventuality when talking about how to connect up a home theater system. We spent a long time tinkering with Photoshop graphics and setup photos, trying to communicate just how best a system can be connected. In the end, we've gone for simplicity over everything else. Connecting a system and getting things right can be a giant pain in the backside, so we decided to make things as simple as possible, with a few straightforward tips and a set of components that we think most people will either have, or have something close to.
Here’s what we’re running:
And our cables:
We’re going to connect all these up. Let's do a couple of housekeeping bits first.
Receivers get hot. You need to leave a bit of space around them to make sure that they have enough ventilation. If you have to put them in a cabinet, try making sure the space around them is clear.
Make sure you have all the correct cables. This includes speaker wire – and when it comes to speaker wire, there are two things you can do to make your life easier. Always give yourself an extra few yards, and then make the cut when you're absolutely sure where you're going to place a particular speaker, and label each cable. Not just the positive and negative lines (we use a black sharpie on each side to indicate the negative wire) but also what each cable is driving (left front, right front, subwoofer etc). Trust us: this will make your life a lot easier.
 SVS Ultras, most speakers only have two binding posts | The Master Switch")
So: applying what we know from the breakdown of the rear of the receiver above, let's apply this to battlefield conditions.
The PlayStation and the TV are the easiest. You run an HDMI cable from the back of the console to an HDMI In port on the receiver – any will do, although the Marantz has a dedicated port labelled Game. Then, you're going to run another HDMI cable from the HDMI port labelled Monitor1 ARC to the back of the TV.
Sound next. Each speaker, with the exception of the subwoofer, is going to be connected to the binding posts by a single wire, split at both ends. Red connects to red, and black to black. The labelling should be pretty self-explanatory – we connect the two tower speakers to the Front Left and Front Right posts, the centre speaker to the Centre post, and so on.
Okay: you’re wired up. Only one last thing to do, which is to connect the subwoofer. We don't need to send power to the subwoofer, as it has its own amp. All we need to do is send an audio signal to it, which we do by connecting the RCA cable to both the sub and the dedicated Sub Out ports on the Pre Out section.
And in terms of connection, that's it! Obviously, things can be a lot more complicated – we haven't even touched on things like multizone setups, or adding other amplifiers to the mix. But as a general principle, this will get you started.
The last thing you need to do is calibrate the system. The Marantz actually includes a fantastic room calibration set up with an included microphone, but even if your receiver doesn't offer this, it should offer a relatively comprehensive on-screen menu that allows you to set things like the subwoofer crossover, and the number and size of your speakers, to optimise the sound.


